Sunday, March 28, 2010

Speakers, Part 2

Several weeks ago one of my blog posts was about building a set of speakers for my workshop. I had been using an ancient pair of powered PC speakers hooked up to my iPod, but I wanted something better. A friend of mine sent me a picture of someone who made a set of speakers out of an old NATO 50cal ammo can, and I knew what I had to do. During the Part 1 post, I wrote about buying parts. Well, the speakers are built and tested, so this blog post will include what I did, and what I might do differently the next time.


The completed unit

The ammo can that I decided to use was an East German, or possibly WWII Nazi issued 8mm box. I chose it as it was the same width as the standard NATO 30cal box, but just a little longer, which would give me room to mount everything in a narrower case then what I had seen pictured. Everything came in on time except for the 30 watt amplifier kit, which ended up being backordered for two weeks. All of the hardware not ordered from Parts Express came from the local True Value hardware store, except for a tube of electronic soldering flux which I picked up at Radio Shack.

The first thing that I did was sketch out what I wanted to make on graph paper. This let me determine before I started cutting where the best place to mount everything would be. Once I knew where I wanted it to go on the model, I marked off the center points on the ammo can, and cut them out with a 4 inch hole saw, a drill press, and lots of cutting oil. Holes cut; I dressed them with a pneumatic die grinder to remove and leftover flashing.

I thoroughly cleaned the face of the can from years grime and grease, and masked off the top and sides of the can, which I wanted to remain OD green, with 50 years of patina. I then primed the face, and then painted it John Deere yellow (which also happens to be a perfect match for all of the 1950 and 1960s era fallout and radiation bunker signs.) I let the paint dry for 24 hours before moving to the next step.


I covered the face with 2 inch blue painters tape, and drew on my stencil with a pencil and compass. The stencil was then cut out with a fresh razor, and the areas to be painted were peeled off, leaving a perfect mask. Two coats of satin black later, I was done painting. Once the paint had set, I pulled off the rest of the mask before the paint had time to completely dry and stick to the tape mask.

At this point I was ready to put in my insulation. I was using RaaMatt automotive deadener – and I will not be using it on future boxes I build. The black tar that sticks the stuff to anything made a mess once the speakers were mocked in for test fitting. To help solve the problem, I sprayed rubberized undercoating on all the insulated surfaces. This has helped, but not eliminated, the problem.

When the amp got in, I spent an evening soldering in the bits the needed soldering – which was not as much as I had expected. The amp, unlike many of the kit amps that I had found, came largely built. All I needed to solder on were the four speaker wires, aux power leads, and two output capacitors in line with the speaker wires. The amp was mounted onto the internal iPod pocket I had made out of some scrap sheet metal in my shop. It was attached with industrial strength mounting tape.


The final touch was to add rubber feet to the bottom and back face. This was to keep the metal can from rattling against whatever I had it set on when it was playing – or rattling against the wall if I had it hung up. The speakers can be used two ways. For outdoor usage, everything can be kept internally. The speakers will run off batteries, and the iPod has an internal pocket to keep it out of harm’s way. However, this makes it hard to change what you want to hear, and the batteries will eventually die. For regular usage, the iPod can attach to an input on the back of the speakers via a three foot cable. There is also a 12 volt AC adapter that plugs into the back of the set for constant use near a standard power outlet.

The set has surprisingly good bass given that it is only two 4 inch speakers. Sound quality is excellent, until the volume is turned up – at which point the amp picks up a interference and distortion. I have read that better output caps would help with that, as well as bridging the channels – which I did not do. That said it is considerably louder than the 3 watt per channel PC speakers that I had been using.
If I make more of these – either for sale or as gifts – the primary change I need to make is in insulation. I need to find something better then the automotive tar/asphalt based stuff that I used. A tall order, given the slender form factor I have to make use of In order to continue to use the 30cal ammo cans. Future units would also not use the internal iPod pocket, at least as I made mine. Fabric, instead of sheet steel, would be a simpler option.

Site Visits

Last week I was travelling to different Universities to do site evaluations for the different vendors bidding for the Paperless University project that we are running. We hit two different schools in two different states in two days. I have now seen six different vendor demos and site visits for this project, and I have learned a lot of what to do – and not to do – when suggesting a site visit. The following will be a simple list of things NOT to do as a technology vendor during a site visit. Sadly, I got to experience all of these “not to do” points.

1) Do your homework! When you arrange the site visit with the hosting company, make sure that the company is actually using your product the way that you have told your prospective customer. And if you are not sure what the hosting site is doing, err on the side of caution. Nothing irks a prospective customer more than feeling like the time and money spent in going to the site visit has been a waste.

2) Listen to the prospective customer. If the customer tells you what they want to be able to see during a site visit, make sure that they see it, or make sure that they know why they are not going to see it at the site that you have set up for them to tour. If the customer says that they want to see they best that you have to offer, make sure that they see it. This is closely related to Item 1.

3) Don’t Hover. Part of the reason a customer goes on a site visit is to be sure that they get to talk candidly with the staff and administration of the host group. This can’t happen if the vendor has someone minding the conversation at all times. A vendor that will not give its potential clients time to speak freely with the hosting company could lead to the assumption that the vendor does not want candid conversation.

4) Show up! The other side of the coin is sending the potential vendor to the site with no vendor control. It is helpful to have time with the vendor to talk about the product and explain other ways that it can be implemented. One of the biggest disappointments that my travel team had to deal with last week was the vendor paying for lunch, but not sending a rep to mind the time. The result was that the host treated the site visit as an excuse to take a long, fancy lunch – and we got very little value out of the site visit before needing to catch our plane back home. This leads us to the next and final point.

5) Cater food on site. The site visit, for the customer, is about content, not lunch. The potential customer has a limited amount of time in which to get the best idea possible about how the system they are reviewing works. While a catered lunch may not be as sexy as a fancy seafood place, having to take the time to drive to the restaurant and then wait for service is not a good use of time for the prospective customer. Have food catered on site, and plan a lightweight meeting around lunch.

Sunday, March 21, 2010

Disruptive tech in the workplace

There were several very interesting presentations made on the various disruptive technologies. The assignment to to choose one of the technologies for use in my place of work was an interesting problem. The University that I work for has stated that its technology goals include adopting technology earlier into the Gartner hype circle. We already use some of the technology on campus. The campus has embraced social networking. We have been developing web mashups. There are other technologies that do not apply to a university, such as the full body scanners. At least i would not like to work here if we did.

There is an obvious choice, though, and it was not made by me. The CIO for the University had named cloud computing to be the future, and we must boldly step towards it.

The question is not when, but how. Nearly every new application being brought on campus is being looked at through the view of placement on the cloud. I am not sure that I agree with this view yet, but it is only because I am not sure that it will work as well as we are told it will work.

Costing for the clouds, while advertised as low, can actually be more expensive then traditional servers, depending on the costing scheme. Many of the cloud based systems are cheaper only if you reduce your workforce - and that simply is not the University way. There are still many questions to be answered before cloud technology will be fully accepted, but I think that many of those questions are going to have to be answered on the fly.

USB 3 is comming

Easily transportable data storage has always been something that I have been interested in, even before I worked in technology. I was one of the few people that bought Jazz drives in the late 1990s. I did not know what I would ever do with one whole gig of storage, but I knew I wanted it.

Of course, tech has advanced a lot since then. USB2 revolutionized storage with the advent of the flash drives. However as drives got bigger, USB2's slower transfer rate became the limiting factor. An 8 gig flash drive can take over 20 minutes to move data into. While the small size makes them handy in a pinch, the slow transfer rate make them unwieldy for use in applications where speed is needed.

USB3, which has been delayed now for almost a year, is supposed to come on line in 2011. When it does, the higher throughput will make using larger drives in situations where speed counts a possibility.

Depending on your source, USB3 is to have a theoretical throughput of 4.8gbps. Though that speed will not be possible in real world applications, even 50% of that speed will still be 10 times faster then USB2. USB3 will also provide more power to devices then USB2. Even so, the USB3 will throttle back the power when it is not needed. It will also be fully compatible with USB2 devices.

It is going to be a major improvement.

Saturday, March 13, 2010

Zach Through the Ages

I have always had a deep love for history. While many of my current academic peers have business degrees, I dual majored in History and Fine Arts. The summer of my junior year I met a guy at a party that did historic reenacting. He was a member of the 1St Maryland Rgt, a group that reenacted the American Revolution. Nervous as all get out, not knowing what to expect, I went with him to a reenactment. The folks there made me feel welcome, lent me clothes and gear, and I was hooked. Over the years I have gotten to do things and visit places that many people never get to do(have you spent a summer crawling in the rigging of a tall ship?) The list is just going to be a chronological recap.

1720's, ships crew on the Kalmar Nykle out of Wilmington Deleware (2000, 2001).

For about a year, I mixed a love of history with a love of sailing. Normally, we did not sail in costume, but it was very cool when we did. I learned the trade over the winter - taking a 3 month course on working the ship, learning where all the lines go, and how to climb safely. Which I am doing in the next picture.

Amusingly, I very nearly died moments after that picture was taken. The leather soled shoes slipped on the painted rigging and I lost my footing before I could clip in. I nearly took a 50 foot express trip to the deck. It was the last time I ever wore "correct" shoes aloft.


I'm in the brown coat, commanding one of the ships cannon. The cannon is loaded, which can be determined by the fact that there is a leather glove over the touch hole. You don't want an errant spark setting off 1/2 pound of black powder before you are ready. People have literally lost hands at events when that kind of thing has happened.

I eventually stopped as the commute from Baltimore to Wilmington most Saturdays sucked and was eating too much of my time away. I'd still be doing it if I lived a bit closer.

1780. First Maryland Regiment, American Revolution. 1996 - 2007
Where it all began for me, and the only group that I have stayed with over the years. I have traveled to other countries, camped on the battlefields where our nation won its freedom, climbed handmade wood ladders up the walls of old forts, and even got married reenacting the Rev War. I was the commander for the 1MR for 4 years, and only gave it up as I knew I would not have time to continue running the group as a father and a grad student. When I finish my MBA in August, I am looking forward to being able to go and play with the 1MR again.

First pic is my old private's uniform, taken on the Guilford Courthouse battlefield in North Carolina.

The next is when my wife and I got married in Oct. of 2006, at Williamsburg, VA. Nerdy? Yes, but it was the single coolest thing I have ever done.


1812, Ships Company, USN (2005-2007)
This was another cross over for me. Another chance to spend time on the water with some folks that I had gotten to know through the 1MR. Plus, at the time they were trying to get funding to build a replica ship rigged cutter to sail on the Bay. I played with them for a few events, but started this period right before I stopped reenacting to concentrate on being a grad student and a dad. I mainly liked the idea of playing on boats in funny clothes.

For this one, some of us were doing small boat drills on the Canadian side of the Niagra.


1870's, Market Hunter (2000 - 2007)
This was a fun period to reenact. I did this period for years, but only did one event per year. The event, "Marching Through Time," held in April every year near College Park, was a timeline event - where several different groups from several different time periods set up historical set pieces. It was always laid back, the weather is springy and fresh, and I always looked forward to it. It was as much a chance to see people that you had not seen all winter as it was to educate folks about the past. Our group usually put together a camp of market hunters - those guys that killed all the buffalo and sent the skins back East to drive the American industrial revolution. I was the camp cook, and spent the entire weekend cooking and drinking and talking and... drinking. I great way to pass a weekend.
My wife and I, not thinking about Monday.


1944, Belgan SAS, 15th Scottish Recce (2001-2005)
WWII. Next to the American Civil War (ACW) it is the most popular reenacted period world wide. Folks I knew from the Buffalo Hunters camp convinced me to give it a try. So I did, and I did not have a great time at first. Time periods prior to the ACW tend to be family oriented. Events are created with the idea that they will be attended my the public. You get a chance to talk and educate. With WWII, my experience was that it was a bunch of middle aged men playing a very expensive game of cowboys and indians. Then, one day we were camped with another commonwealth group that were playing with armored cars. I jumped ship, and started doing that and realized I was having fun again. So I helped restore 3 armored cars and, and spent the weekends in the drivers seat. Did you know that you could pop a wheelie in a 4 ton 60 year old armored car? You can! I found out while drag racing one of the other armored cars on an old grass runway. Serious business. :)

I left the group in 2005 when they started bickering and in-fighting. I did not want to do that, I just wanted to wrench on old iron.

This is the vehicle that I did most of the work restoring. I wished I was in a place to have bought it when the owner sold it. I'm standing in the drivers seat, right before a parade (its English, so the driver sits on the right.) The armored car is a Bren Gun Carrier, made in Canada in 1943. Fun Fact: Canada and the US supplied England with nearly their entire war machine, after the Brits had to abandon everything during the retreat from Dunkirk in 1940.


This is the only C-15T/A left in running condition in the world. And I got to drive it. Wicked cool armored car.

VW-Porsche 914 Restoration (in pictures)

Over the past 10 years I have restored, or helped restore, seven different vehicles; only two of which actually belong to me. I love working with my hands, and I don't get to do it all that much with my job and school. I also need outlets for stress. I used to get this through competitive sailing, but now that I live in PA I am land locked. This kind of hobby helps me blow off steam and focus my thoughts. So, I thought I'd blog about how I went about restoring an old Porsche.

My 914 (sold as a Porsche in the US, and a VW in Europe) is my favorite toy in the world. After helping build several old WWII British armored cars, I decided that I had skills enough to build something for myself. I knew I wanted something sporty and air cooled. When I discovered 914s, I fell in love. I bought mine in October of 2005.

It was dented, the engine did not run, the paint sucked - but the body was not rusted too much and the car was complete. It took forever to get it home, but by midnight that night, the car was in my garage and I was happy, if tired. The very next day I started taking it apart.

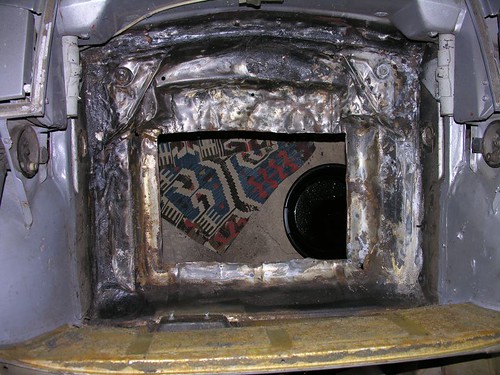
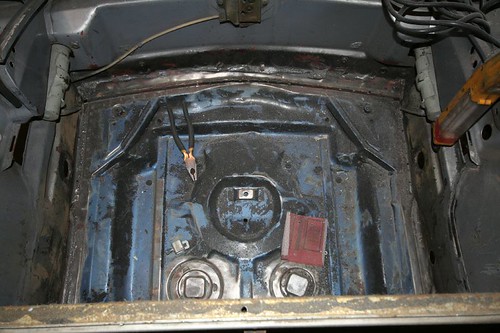
The first year was spent taking the car apart and fixing all the stuff that had broken over 30 years. I had to learn how to weld. What rust I found I cut out and welded patches back in. This included needing to cut out and weld in an entire front trunk pan (since the engine of a 914 is in the middle, it has front and rear trunks).

Old and busted.

Replacement welded in.

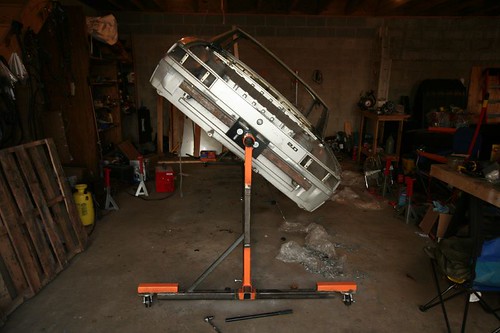
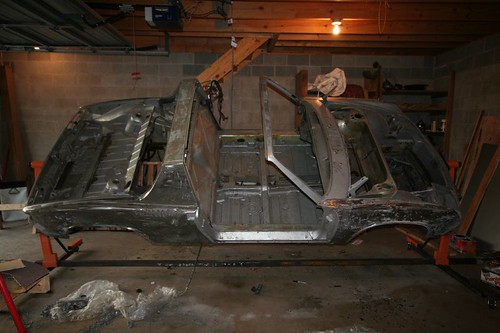
By Oct of 2006, the engine had been removed, all the parts were stripped from the body, and all the rust had been fixed. It was time to paint. The first thing I wanted to do was build a car rotisserie. Similar to the kind used for cooking, this is something you mount the car on so that you can spin it on its axis. It makes life easier for stripping and painting the car. You can see how it works in the pictures. Also, note that the car has been stripped to bare metal - and that metal has been all beat to hell. I found out when I stripped the old paint off that the car had been wrecked at some point. :(


By October of 2007, the car was painted and off the rotisserie (which I then sold, and made a tidy profit on to boot).


However, things were slowing down. In 2007 I also started the MBA program, AND found out I was going to be a father in early 2008. I was putting the car back together, but it was still going to take 2 more years before it was road worthy.

Next up was the engine. The stock engine was a VW T4 motor, similar to the ones used in the Bus and the VW 411 Squarebacks. It had been tuned by Porsche and had more power, but at 95hp it was rather lack luster by modern standards. So, I built a better one. Not having the budget to go too big, I bought parts to build up a motor with a small displacement increase, but significant torque and power increase. I got this by increasing the compression ratio (how much the fuel/air mix get squished before it is ignited), electronic spark distribution and putting in a more aggressive camshaft. I also sold off the original fuel injection system and added dual Weber IDF carburetors, as the old injection system was a power bottleneck. the last big change was the exhaust. All aircooled VW and Porsche cars get heat by running fresh air over the exhaust pipes and then blowing that into the cabin. However, if you ditch the heat exchangers for equal length headers, you can squeeze even more power out of the motor. As the car is a summer toy, I did not think twice about loosing the ability to heat my car. On chilly mornings, I wear a jacket. :)

The first picture is the engine case opened up to show the crank, rods, and camshaft.


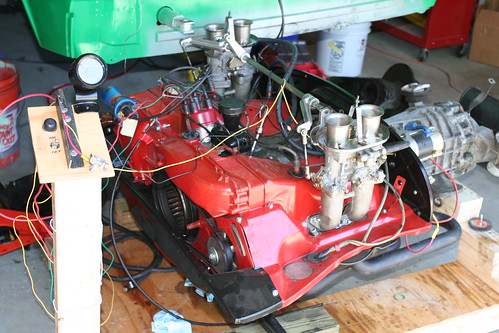
This picture is the engine and transmission hooked up on a testing stand I made to run the motor out of the car. This way I could test and tune my rebuild before reinstalling the motor.

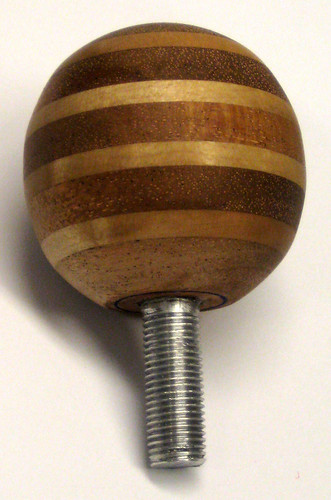
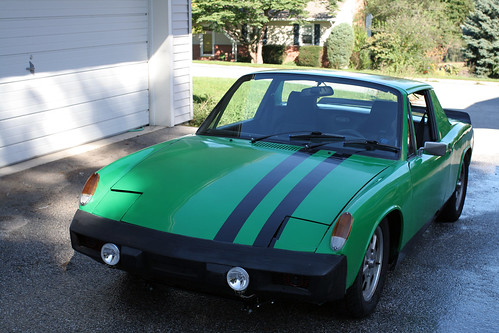
The other neato mini project that I did during the January of 2009 was start producing shifter knobs for these old cars. In the late 1960s Porsche made a race car called the 917. It was the real star of the Steve McQueen movie "LeMans." These cars had a simple wooden shifter knob, that I later learned was turned from poplar plywood. It was very lightweight (made for a race car, after all, but also insulated the drivers hand from the shift lever which got hot during the race. The knobs are a popular add-on for vintage Porcshes, but are not commonly reproduced. I made a small run of five knobs, turned from maple and mahogany. I kept the first one I made, and sold the rest at $50 a knob. I glued up blanks to make 10 more, but have not had the time to go back and cut them out and turn them. The following pic is the unfinished prototype, and the next is the finished knob in my car.


FINALLY, over the summer of 2009 - nearly 4 years after buying the car - I got it on the road in time for the Hershey Park Porsche Swap Meet in April. I had a wonderful summer driving the car.


The car isn't "done." I doubt it will ever be done, as my tastes change - and then the car changes to suit my new interests. While put away for winter, I made MANY changes already, but none of them major.

So, whats next? Well, I bought this 1968 Jeep M715 ex-army pickup that needs a little love. Its been sitting for the past year as I just did not have time to do much with it and I promised myself I'd finish the 914 before I started it. Work starts this spring. :)

Sunday, March 7, 2010

Internet liberalization

One of the speakers from our last class, Gretchen Klebasko, spoke of something I had never heard of. The idea was interesting enough that I wanted to do some reading to find out more about it.

Mrs. Klebask mentioned that she would be needing more staff to continue protecting Legg Mason's IP once ICANN instituted its new Internet Liberalization policy. Initial googleing on the subject was not successful, however, as ICANN refers to the new policy as "New gTLD." Totally descriptive.

"gTLD" stands for Generic Top-Level Domain. They are the 2 to 4 character strings that define an IP domain name. I.E.: ".com" is a gTLD. Well, starting "sometime" in 2010, for the low, low price of $185,000 (plus fees amounting to $25,000 a year), you too can buy your own custom gTLD.

ICANN proposed opening up its gTLD structure in spring of 2008. Though they expected accolades (more choice is better, right?) they got slammed by everyone from IBM to the United States government. The program has been delayed for the past 2 years as ICANN has tried to work with governments and businesses to make the new scheme workable. According to ICANN's website, the New gTLD program will start this year.

At issue is that if folks can buy up the new TLDs, it will be relatively easy to spoof businesses. For instance, for about $200,000 IBM's rival could purchase ".IBM" as a gTLD and either hold it for ransom (cybersquatting) or use it to set up a site which could harm IBM.

The past 2 years have been spent with ICANN working out vetting processes to make sure that situations like the example above to not occur. However, businesses are still concerned about what will happen once the new program is launched.

Speakers, part 1

I like to tinker. This may or may not be a surprise to folks by now. My friends know this, and occasionally send me ideas. Friday, as I was starting into work for the day, I got an email from a friend with a link to a gizmodo article.

Long story short, some company in England is charging $600 for this:


Right now I am using a pair of beat up old PC speakers in my shop, and have been looking for something that sounds a little better, has a bit more volume, and is a bit more sturdy. PC speakers usually have 3 watts per channel - they are only meant to work on a desktop, not really a room. The "A-Box" has 13 watts per channel - or 35 watts per channel if you really want to spend the cash. The 25 watt version (the "cheap" one) was still over $400. No freak'n way.

BUT! How hard could it be to build? And thus, every spare minute I had Friday I was of searching the web for parts. Luckily, someone suggested I check out Parts Express. I found 4 inch speakers with a pretty good range (for 4 inch speakers - • Max. music power: 120 watts • Nominal power handling: 25 watts • Frequency Response: 35 Hz to 30 kHz • Sensitivity: 87 dB • Impedance: 4 ohms • Dimensions: 4-1/8" • Mounting depth: 1-3/4")

I found fan grills that would match the mounting holes to the speakers. And I also found these, which are even cooler...


I found several possible amps. But the one I chose was a little 35watt DIY digital amp. It has been years since I actually soldered together an amp, so this really called to me. I even bought a new soldering iron after a friend derided my ancient iron as a "soldering machete."

It is just a simple 2 channel amplifier. But it is very small, and has a remote volume pot. And I get to build it. Even better. The amp has a jack for a 2000ma 12vDC plug in adapter, so I bought one for wall socket use. But a also bought an 8 cell AA battery holder that I am going to solder into the amp, so that I can use it away from house power.

The case is just an old ammo can - used by the military to hold ammunition. Most guys have some laying around somewhere, and DIYers tend to use them for just about anything. A-Box is using 50Cal cans. I have a few of them, but they are actually being used holding stuff, they make great parts holders. I have several 30cal cans that are empty, though. While these are slimmer then the 50cal cans, everything that I ordered will easily fit into the 3.25 inch internal width. The can is actually 3.5 inches inside, but roughly 1/2 inch will be used up with RaaMat automotive sound insulation (which I had on hand from my automotive projects). This is important or else the can will resonate and sound like poo.

I ordered the parts on Friday night after work. My cost was $82. If I had gone with cheaper speakers, the cost would have dipped down into the $60s. However, the cheaper speakers did not have as wide a range.

I vetted ideas through a few forums that I visit, and I have already had people asking me what I was going to use for a sub. At this point, I am not planning to use one. I'd have to use a bigger ammo can, and a different amp. If this project turns out well, I may make a MkII version out of a 20MM ammo can, that has a sub woofer, and a 100watt amplifier.

Part 2 will be the build post, assuming that I get around to building this before the end of the semester.